


Print this Topic
Getting Started
Booking time onto projects or non-productive tasks is a simple process using the Bar Coding feature in Aerotrac via the Time Clock application.
At any time, you can navigate without using a scanner per the on-screen instructions using the mouse and clicking the on-screen buttons, or pressing the appropriate keys on the keyboard, including the Function (F) keys at the top of your keyboard.
The first thing to check is that the Job Booking fields at the top section of the Time Clock are empty before you start — if this is NOT the case, either click on the Cancel button or press the Esc (Escape) key on your keyboard to clear them (the hot key is ALT C, if you prefer):-


Job Booking
Firstly, scan the barcode against your name, if you have it on your badge, for example, or press the F2 key on the keyboard, or use the mouse to click on the Employee ID Lookup button.
Next, if you have the Project routing sheet, scan the barcode next to the op number you want to book time to. Alternatively, you can use the F-keys, page up/down and arrow keys on your keyboard to select and scroll, or use the mouse to click on the appropriate lookups buttons and the scrollbars to move up and down the lookups:-

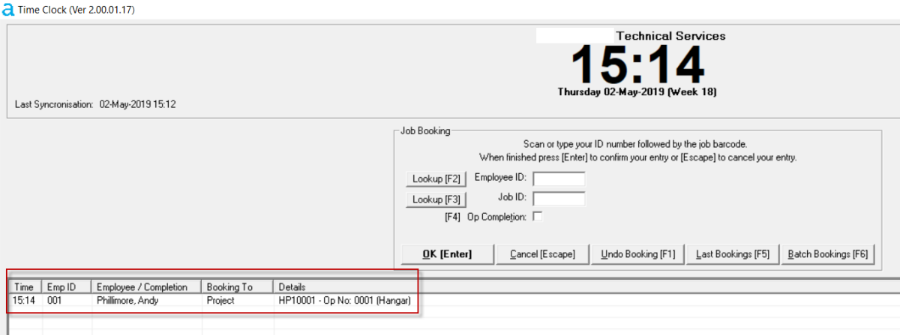
When you have selected the appropriate op, press the (Enter) key, or click on the OK button. A summary will appear on the screen. You can clear and start from scratch at any time by pressing the Esc key on your keyboard, or by clicking on the Cancel button on the Time Clock screen:-

Clicking OK will add the booking to the table view where it will sit for further checking and removal if necessary - see below :-
After a period of time the booking will synchronise with the server and disappear from the Time Clock screen. The actual time period is subject to the Synchronisation and Undo WIndow settings in the Time Clock Setup (refer to section Time Clock Installation and Setup),
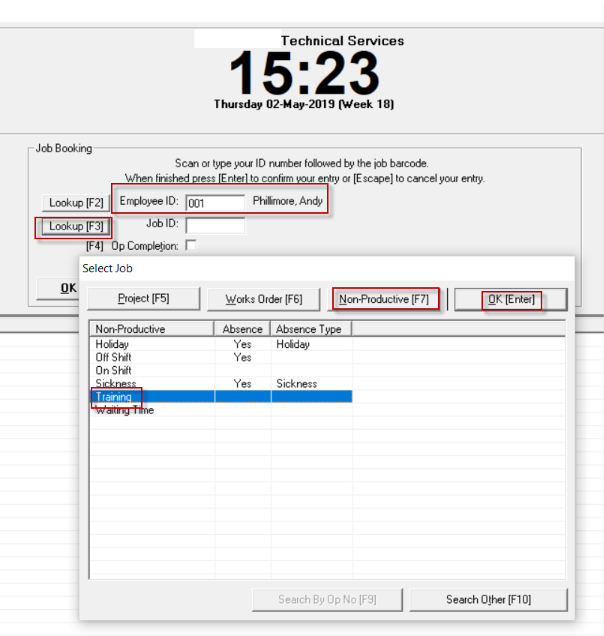
Non-Productive Booking
As with job bookings, before starting, make sure that the white Job Booking fields are empty, and if not, press the Escape key on the keyboard, or click on the Cancel button on the screen.
Whether you use the scanner, the mouse or the keyboard, as above, either scan the barcode against your name, and then the barcode against the nonproductive event, or lookup your name, then open the Job ID lookup, then the Non-Productive options, select the appropriate event and press Enter twice, or click on the OK buttons:-

Last Booking
This option lets you check the 20 most recent bookings you have made.
Enter your Employee ID in the Job Booking section, then either click on the F5 key or the Last Bookings button on screen:-

.
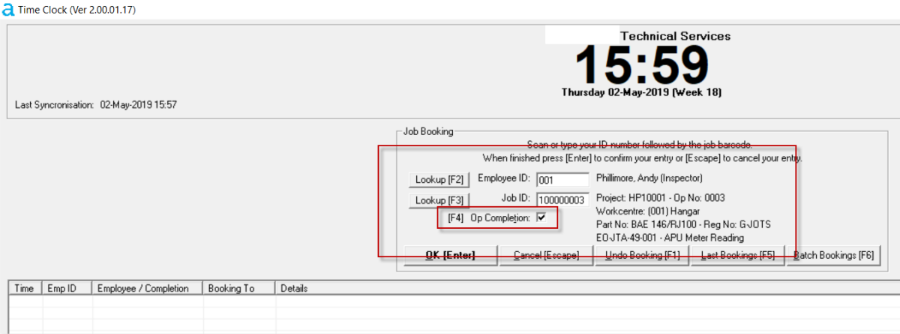
Op Completion
Prior to using the Time Clock facility, you may wish to set one of the System Options that gives you the option to disallow further time bookings to ops which have been completed. Refer to topic System Options - Personnel
On the Time Clock screen, make sure that the Job Booking fields are empty, if not, clear them using the Escape key or Cancel button.
Enter your employee number (by scanning, or using the Lookup function). If you have the Routing sheet, scan the barcode for the task you want to complete, otherwise select the op number from the lookups tables as above, then either press the F4 key or click on the Op Completion checkbox on the screen:-
When you press Enter, or click on the OK button, the op will appear in the Table View, and stay there for a period of time giving you the opportunity to check and undo if it was generated in error:-

Note:Only completed Ops which have cleared from the job booking table view of the Time Clock screen into the database will prevent incorrect time booking. Completed Ops remaining on the table view will still allow time to be booked until they clear.
Undo Booking
New Bookings will remain on screen in the Time Clock table view for a period of time to give you time to check the details are correct. This time period is subject to the Synchronisation and Undo WIndow settings in the Time Clock Setup (refer to topic Time Clock Installation and Setup ).
If you have entered an incorrect booking, click on the Undo Booking button (or press the F1 key) to clear the booking.

Now, click OK, then confirm your action, and start again:-

Batch Bookings
Prior to using the Batch Bookings function of the Time Clock facility, you will need to set some options within the system:-
-
Enable Batch Bookings via the System Option - refer to topic System Options - Personnel
-
To disallow further Time Bookings to ops which have been completed - refer to topic System Options - Personnel
-
To automatically “force” employees off-shift and the end of their shifts - refer to topic on Non Productive Codes - Forced Off-Shift Code under Personnel Setup
Once the above setup is in place, the Batch Bookings button will now be available for selection on the Time Clock screen, and you are now ready to use Batch Bookings.
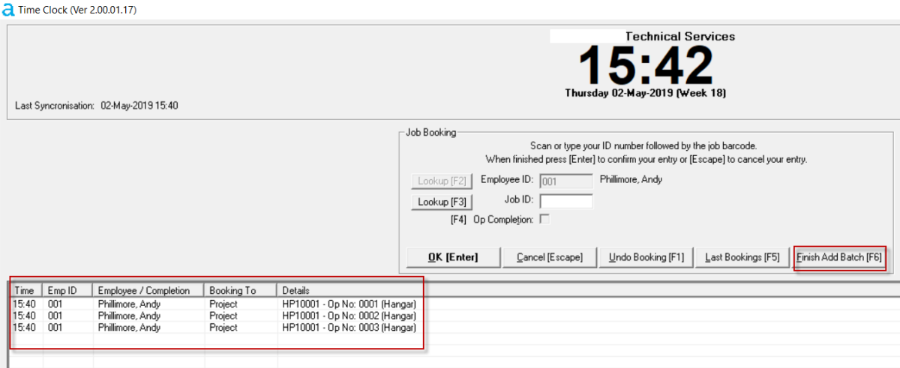
Using Batch Bookings
When you are ready to enter a Batch Booking, make sure the white fields are empty (or clear them using the ESC key or Cancel button), select your employee number (by scanning, or using the Lookup function), then click on the Batch Bookings button (or press the F6 key).
Aerotrac will provide you with a Batch Booking Reference Number in a popup window, click OK:-

The Batch Bookings button will toggle to say Finish Add Batch.
Now, select which type of booking you want to make, then scroll down the list and locate the job Op number. When you have selected it, click OK (or press Enter) TWICE to add the selection to the Table View, then continue to add Ops to the booking as required.
When you have completed listing the Batch jobs, click the Finish Add Batch button (or press F6):-
Aerotrac leaves the bookings on screen for a period of time to give you time to amend / correct any errors (using the Undo Booking function described above). This time period is subject to the Synchronisation and Undo WIndow settings in the Time Clock Setup (refer to topic Time Clock Installation and Setup ).
After this time the Time Clock Table View will clear the bookings to the server. You will then be able to view them by selecting your Employee number and clicking on the Last Bookings (F5) button. The Batch ID will be displayed in the Last Ten Bookings Table View.